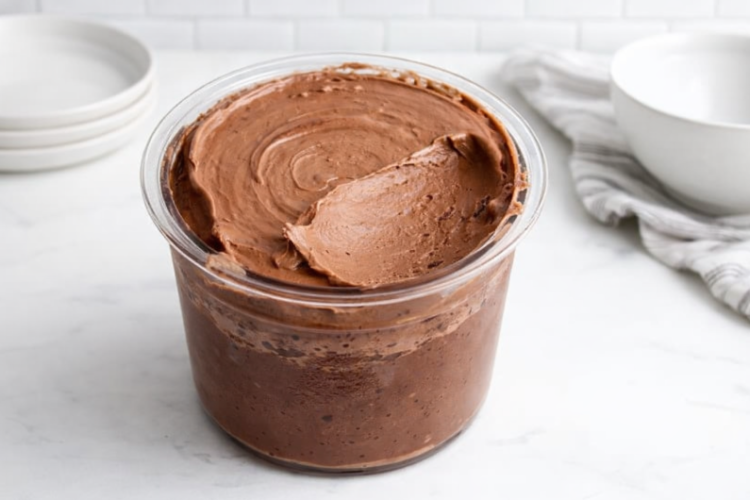
Craving something creamy and chocolatey without derailing your nutrition goals is one of the more common struggles for anyone trying to eat well while still enjoying dessert. This chocolate protein ice cream solves that problem by turning a protein shake into a genuinely indulgent frozen treat using the Ninja Creami, a machine built specifically for transforming frozen bases into smooth, scoopable ice cream. It works equally well as a post-workout reward or a simple evening dessert, delivering rich chocolate flavor alongside a meaningful dose of protein in every bowl.
Why the Ninja Creami Changes the Ice Cream Game
Traditional homemade ice cream usually calls for heavy cream, egg yolks, and a churning process that can take considerable time and effort to get right. The Ninja Creami works differently, starting from a fully frozen block of your chosen base and then spinning it at high speed to break the ice crystals down into a smooth, creamy texture. This approach makes it possible to build ice cream recipes around lighter, protein-forward ingredients like shakes and milk rather than relying on cream and sugar, which is exactly what makes a recipe like this one possible in the first place.
Building a Better-For-You Base
Why a Protein Shake Works So Well Here
The foundation of this recipe is a chocolate protein shake, which does double duty by providing both the creamy base the ice cream needs and a substantial amount of protein that a typical ice cream recipe simply would not include. Using a pre-made shake also simplifies the process considerably, since the flavor and protein content are already built in without requiring separate measuring of protein powder, sweetener, and liquid. This makes the recipe accessible even for people who are not particularly experienced in the kitchen but still want a protein-rich dessert option.
The Role of Cocoa Powder in Deepening Flavor
Unsweetened cocoa powder is whisked into the protein shake to intensify the chocolate flavor well beyond what the shake alone provides. Because the cocoa powder used here is unsweetened, it adds depth and richness without contributing extra sugar, which keeps the overall recipe aligned with a lighter, more health-conscious approach to dessert. Cocoa powder also carries naturally occurring antioxidants, giving this ice cream a small nutritional edge on top of its flavor contribution.
Why Sugar-Free Pudding Mix Makes a Difference
A tablespoon of sugar-free chocolate pudding mix is stirred directly into the base without any cooking or preparation beforehand, and its main job is to thicken the mixture while adding an extra layer of smooth, velvety texture. Pudding mix contains stabilizers and thickeners that help the final ice cream hold together better once spun, preventing it from turning icy or watery. Because it is added in powdered form straight from the box, it blends seamlessly into the shake and cocoa powder mixture without needing any extra steps.
Choosing the Right Milk for Creaminess
Whole milk rounds out the base, adding richness and helping every ingredient blend into a smooth, pourable mixture before freezing. For anyone who is lactose intolerant or prefers a dairy-free option, plant-based alternatives such as oat milk work well as a substitute without significantly changing the final result. The type of milk used can subtly affect both the sweetness and creaminess of the finished ice cream, so it is worth experimenting to find the option that best matches your personal taste.
Mixing the Base Correctly
Getting a smooth, well-combined base before freezing is one of the most important parts of this recipe, since any lumps or unmixed pockets of cocoa powder or pudding mix will carry through into the final texture. Starting with the protein shake in a mixing bowl and whisking in the cocoa powder first allows the powder to dissolve more easily than if all the ingredients were added at once. From there, the pudding mix and milk get incorporated in sequence, with a thorough final whisk ensuring the entire mixture reaches a smooth, uniform consistency before it goes into the freezer.
Freezing the Mixture Properly
Once the base is mixed, it needs to be poured into a Ninja Creami pint container, taking care not to exceed the maximum fill line marked on the container itself. Overfilling can cause problems during both the freezing and spinning stages, so it is worth double-checking the fill level before sealing the lid. The pint should then be placed on a flat surface in the freezer, which helps it freeze evenly throughout rather than developing uneven pockets of soft or overly hard mixture. A full 24 hours of freezing time is necessary to create the solid block that the Ninja Creami needs in order to process it correctly.
Spinning the Frozen Base Into Ice Cream
After the mixture has frozen solid for a full day, it is ready to be transformed into ice cream using the Ninja Creami machine. The lid comes off the pint first, and the pint itself gets placed into the machine’s outer bowl, which then locks securely into place before being set into the base of the Ninja Creami unit. Twisting the outer bowl until it clicks into position ensures everything is properly secured before the spinning process begins, which matters both for safety and for getting an even result.
Choosing the Right Setting on Your Machine
Selecting the correct program on the Ninja Creami plays a real role in how the finished ice cream turns out, and the “Lite Ice Cream” setting tends to work best for a recipe like this one that is naturally lower in sugar. Because sugar affects how a mixture freezes and how easily it spins into a smooth texture, recipes with less sugar generally benefit from settings designed specifically for lighter, lower-sugar bases. Pressing this button starts the machine’s blades working through the frozen block, gradually breaking it down into the smooth, creamy texture associated with traditional ice cream.
Fixing a Crumbly Texture After Spinning
It is fairly common for a lower-sugar, protein-based mixture to come out slightly crumbly after its first spin, simply because it tends to freeze more solidly than a traditional cream-and-sugar base. If this happens, adding a tablespoon of milk directly to the spun mixture and running the “Re-Spin” function again is usually enough to smooth things out considerably. This process can be repeated as many times as needed, checking the texture after each re-spin until the ice cream reaches a soft, scoopable consistency that still holds its shape rather than turning into liquid.
Serving Fresh and Storing Leftovers
Once the spinning process is complete, this ice cream is ready to be scooped and enjoyed immediately, offering the best possible texture right after it comes out of the machine. Any leftovers can be returned to the freezer, though the mixture will naturally harden again over time the same way any homemade ice cream does. When you are ready to enjoy the leftovers, letting the pint sit at room temperature for about 10 to 15 minutes, or microwaving it briefly for 10 to 15 seconds, softens it enough to scoop without needing to run it through another spin cycle.
Notes on Customizing This Recipe
Trying Different Protein Shake Brands
While a chocolate protein shake serves as the foundation of this recipe, there is room to experiment with different brands depending on what is available or preferred. Switching brands may shift the flavor slightly, since protein shakes vary in sweetness, thickness, and chocolate intensity from one manufacturer to the next, but the overall method and ratios in this recipe remain the same regardless of which shake is used.
Adding Mix-Ins for Extra Texture
For anyone who wants to take this ice cream a step further, mix-ins such as chocolate chips, chopped nuts, or a swirl of peanut butter can be folded into the mixture after the initial spin. Adding these extras before a final re-spin distributes them evenly throughout the ice cream, giving each bite a bit of added texture and flavor beyond the base chocolate profile.
Managing Leftovers Over Time
Because this ice cream will harden in the freezer between servings, it helps to plan ahead slightly before serving leftovers so they have time to soften properly. Letting the container sit out for a short period or using a brief microwave burst are both reliable ways to bring the texture back without needing to run the machine again, though the re-spin function remains available anytime a fully restored, freshly spun texture is preferred.
Selecting the Best Milk for Your Needs
Whole milk delivers the richest, creamiest result in this recipe, but it is far from the only option worth considering. Oat milk tends to add a subtle natural sweetness that pairs nicely with the chocolate flavor, while almond milk and soy milk both work as reliable substitutes depending on individual dietary needs or preferences, allowing this recipe to be adapted easily for a wide range of diets.
Common Questions About This Recipe
Can a different protein shake be used in place of Premier Protein?
Yes, other protein shake brands can be used in place of Premier Protein without changing the overall method of the recipe. Switching brands may result in slightly different texture or sweetness levels, since formulations vary between manufacturers, but the process of mixing, freezing, and spinning remains exactly the same no matter which shake is chosen.
What should I do if the ice cream turns out too hard or crumbly?
If the finished ice cream comes out harder or more crumbly than expected, simply add a tablespoon of milk to the mixture and run the “Re-Spin” function on the Ninja Creami. This step can be repeated as needed until the texture becomes smooth and creamy while still holding its shape.
Is it necessary to re-spin leftovers before eating them?
Re-spinning leftovers is not required in order to enjoy them again. Letting the pint sit at room temperature for a few minutes, or microwaving it briefly for 10 to 15 seconds, softens the ice cream enough to scoop and serve without needing to run it through the machine a second time.
Which pudding mix works best for this recipe?
A sugar-free chocolate pudding mix, such as the Jell-O brand, works well for this recipe and requires no preparation before being added. The powder goes directly into the mixture along with the other ingredients, where it dissolves and helps thicken the base as everything is whisked together.

Chocolate Protein Ice Cream
Course: High Protein Recipes1
servings5
minutes5
minutes24
hours24
hours10
minutesA rich, protein-packed chocolate ice cream made in the Ninja Creami using a chocolate protein shake, cocoa powder, sugar-free pudding mix, and milk. A creamy, better-for-you dessert perfect after a workout or any time a chocolate craving hits.
Ingredients
1 Chocolate Premier Protein Shake
1 tbsp Unsweetened Cocoa Powder
1 tbsp Chocolate Sugar-Free Pudding Mix
1/2 cup Whole Milk (or Oat Milk)
Directions
- Whisk all ingredients together.
- Pour into a Ninja Creami pint and freeze for 24 hours.
- Spin using the “Lite Ice Cream” button.
- If crumbly, add 1 tbsp of milk and re-spin until smooth.
- Enjoy your creamy chocolate protein ice cream!
